Showing posts with label jewelry. Show all posts

Tuesday, October 9, 2012

Peter Pan - Collar of Leather- "How To" and Pattern

I just love all of the necklaces and accessories that are out there in the peter pan collar style.  I have been looking at all of the options, and could not find one that I just loved (at least not enough to part with my cash for it.)  I wanted a peter pan collar that was simplified, light weight, flexible and a statement.  So I made one.


This is what I ended up with.  I made it out of deep red leather.  It was a scrap left over from a different project.  I thought I would share how this was made. This was easy, no sewing, no taping, no hot glue.   If you want to make one, I have a link to the pattern in a  pdf 


Supplies:
  • 8 inch by 10 inch piece of leather (I also have used old leather coats that don't fit or have an unfortunate blemish on them.)
  • permanent market
  • cutting tool (scissors or rotary blade)
  • self healing cutting mat
  • punch tool for setting eyelets (ones used in paper crafting work great, but not a paper punch!)
  • acrylic paint or gum tragacanth**  (the gum is sold only at leather supply stores)
  • jewelry findings and clasp closure
  • embellishments


Steps:
  • trace the pattern onto the leather with the marker  
 
  • cut out the collar shape (cut off all of the black markings)


  • punch holes where marked on the pattern

  • rub the gum tragacanth around the edges of the leather.  You can use your fingers or a spoon.  I have done this step both ways.  It just depends on you.  This gum smooths and stiffens the finished edge of the leather.  It dries clear too.  But, if you don't want to get the leather gum stuff,  you can also CAREFULLY paint the edge with acrylic paint, or leave it as is.  

  • attach clasp closure (on the back I used an oval jump ring and a clasp for the closure. A dot of jewelry glue sealed closed the edges of the jump ring.)

You can be creative here. Use a button closure or piece of ribbon and tie the peter pan collar closed.  Do the back first so the front embellishments are not scuffed up.


  • I hooked a jump ring through the two holes in the front and attached some dangle flourishes to it.  I bought these trimmings while I was in Nottingham, England this past summer.  I am so excited to be using them, not just looking at them wistfully.


Again, the pattern for this peter pan collar project is free. To get it,  click here.    I would love to see your projects.  Send me a picture!
(if you can't open the pdf, email me at whimsyfunk@gmail.com and I will send it to you.)

**For the leather stuff (that is bio-degradable with no harmful emissions) you can go to www.tandyleatherfactory.com. It was around $7 or $8.
  

Monday, August 27, 2012

A lil' stash - mustache that is

Happy New Baby!

My sister is having a baby.... that happens to be a boy.  

Now, Jewelry making is NOT my forte and I usually have to go running to this sister for help.  I tend to make a big mess with the findings and pieces of chain. 

But I am so proud of My self!  I made this little necklace for her as a remembrance of her baby shower and her little man (soon to be here).  


Tad ah!  I love it.  I had a hard time giving it away.  


Enjoy Jannie Girl!  

Add that little bit of whimsy to your life!

-Tara

Saturday, August 11, 2012

Birthday - Penny charm

I seem to be really into penny art right now.  I saw an idea about using a penny with the year your child was born and then stamping on a separate piece of metal their name, to make a pendant for a necklace.  Loved this idea.
I could make a remembrance of my child's birthday- or birth-year. Cool idea.

So, to work.  Wearing heavy jewelry can be a drag. (baw ha ha - little joke) I did not want to add any more weight to the charm/pendant.    I stamped the name of my child right onto the penny.  Then I drilled a hole and added a jump ring.   (If you want instructions on drilling the penny, go to the Pressed Penny post.) Penny's that are not stretched are a little tougher to drill through, so just keep going, the drill bit will go through.

(and I know the stamping is not perfect, but I am not a perfectionist.  Sometimes, good enough is GOOD ENOUGH. I am glad to see this idea to the end - finally!)


I was going to put this on a necklace, but I decided that my children were my
 biggest adventure.  
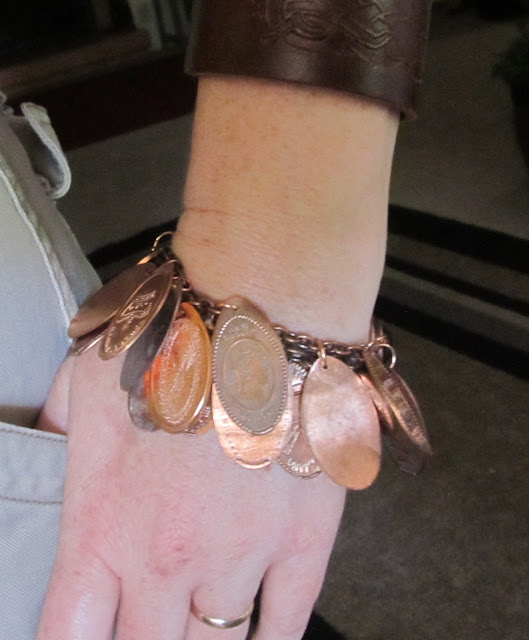
I added the named penny to my stretched penny bracelet representing a journey I have (and still am) taking. 

Lets go explore!

-Tara

Tuesday, August 7, 2012

Pressed Penny

Have you ever used one of those stretched penny machines.  

You know, the ones that press an image into a penny while elongating it into an oval?  It is a fun keepsake of a trip or vacation.  
So what do you do with that?     
I have an idea. 
Make a charm bracelet that tells a story of all the places you  have traveled to.

First Drill a hole in one of the ends of the penny.  
You will need a metal drill bit.

 
After you have a hole, sand the rough edge from the drilled hole. 
(you don't want your penny biting you.)  I use an emery board

When you have a smooth edge on the hole, take a little baking soda and get it a little wet with water. You want a paste.  
Rub the penny to clean it. 

 Now, use your inner jewelry ninja and use jump rings to attach the penny's to a chain.  
I felt it was fashionable to use a copper bracelet.
  

I have been thinking of doing this for a long time.    
I am so glad I did.

If you try this, I would love to see your creations.
Have a fabulous day!  

- Tara