Monday, August 27, 2012

ROCK CANDY!!

I have a sister that LOVES rocks.  She had a baby shower that was all boy and I knew that she needed something to represent one of her loves.  Why not ROCK CANDY!  Yes.... that is what I made.  

If you want to give this a try, 
You will need:
         sugar - 16 cups (you may need a little more or less here)
         water - 6 cups
         food coloring
         chop sticks (or bamboo skewers)
        CLEAN- Clear glass jars
        clothes pins (bigger is better here)
        7 days

Break apart your chop sticks.  Dip them in water and then roll (dip) them in sugar. (I used the sugar that I was using to melt down, before I melted it obviously!) Let them dry.  This gives the sugar something to stick to when crystallization starts.

Mix equal parts of water and sugar in a good sized pot on medium-high, until it is dissolved.  Continue to add sugar until you have AT LEAST a 2:1 ratio - maybe more like a 3:1 ration.  (this is why you need to have more sugar ready to add - if necessary)  The mixture will get to a point where the sugar will be look like a clear syrup, but a little cloudy, yet the sugar won't dissolve really fast any more.  Let it come to a simmer - but you don't need to have a rolling boil.

Now: the jars.  I used liquid food coloring and put that in the bottom of the jars before I added the syrup.

I followed the ratios for different colors right off the box.  If you want flavor, this is also the time to add that.  

Allow the syrup to cool for 10 minutes and pour the liquid into the jars. (I used a wide mouth funnel to help keep the sticky down). 
 As the syrup went into the jars, the food coloring was mixed in. 


 I did try to mix color in after I had poured syrup into one jar,
 it did not work as well. 
 (It looked really cool though) 
So, before is better.


Attach a clothes pin to the top of a chop stick (dipped in sugar) and insert it into the liquid. 


Make sure the stick does not touch the sides or bottom.  


Clothes pins are good in theory, but reality strikes and they did not work so well.  I had to double up the clothes pins to be able to fit over the wide mouthed jars, or find enormous clothes pins (which I happened to have a few).

Place the jars in a warm/sunny place.  Now check on them to see how they are growing.


. . . Three Weeks Later ... (notice the time lapse thing going on here.)
After  WAITING,
The only rock candy on a stick that worked. - it was not even in a fun color!
Out of 11 jars of syrup and sticks, I only ended up with one viable rock candy stick.  The Baby shower is done and gone.  (I actually bought some rock candy from Party City)
So, If you want something that is fun to do, this is "fun", but productive?  Not so much. The science project part worked.   
There were more crystals on the surface than on the stick.

There were lots of crystals in a layer all over the top of the syrup, just not on the stick.

If you need this for an event, I suggest you buy the rock candy.


A lil' stash - mustache that is

Happy New Baby!

My sister is having a baby.... that happens to be a boy.  

Now, Jewelry making is NOT my forte and I usually have to go running to this sister for help.  I tend to make a big mess with the findings and pieces of chain. 

But I am so proud of My self!  I made this little necklace for her as a remembrance of her baby shower and her little man (soon to be here).  


Tad ah!  I love it.  I had a hard time giving it away.  


Enjoy Jannie Girl!  

Add that little bit of whimsy to your life!

-Tara

Saturday, August 11, 2012

Birthday - Penny charm

I seem to be really into penny art right now.  I saw an idea about using a penny with the year your child was born and then stamping on a separate piece of metal their name, to make a pendant for a necklace.  Loved this idea.
I could make a remembrance of my child's birthday- or birth-year. Cool idea.

So, to work.  Wearing heavy jewelry can be a drag. (baw ha ha - little joke) I did not want to add any more weight to the charm/pendant.    I stamped the name of my child right onto the penny.  Then I drilled a hole and added a jump ring.   (If you want instructions on drilling the penny, go to the Pressed Penny post.) Penny's that are not stretched are a little tougher to drill through, so just keep going, the drill bit will go through.

(and I know the stamping is not perfect, but I am not a perfectionist.  Sometimes, good enough is GOOD ENOUGH. I am glad to see this idea to the end - finally!)


I was going to put this on a necklace, but I decided that my children were my
 biggest adventure.  
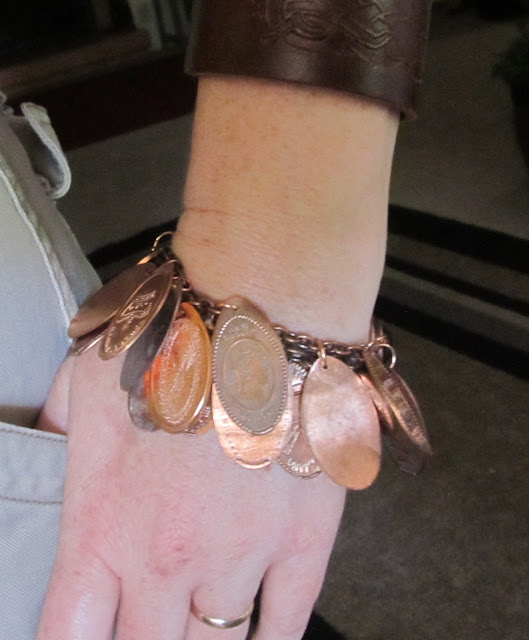
I added the named penny to my stretched penny bracelet representing a journey I have (and still am) taking. 

Lets go explore!

-Tara

Tuesday, August 7, 2012

Pressed Penny

Have you ever used one of those stretched penny machines.  

You know, the ones that press an image into a penny while elongating it into an oval?  It is a fun keepsake of a trip or vacation.  
So what do you do with that?     
I have an idea. 
Make a charm bracelet that tells a story of all the places you  have traveled to.

First Drill a hole in one of the ends of the penny.  
You will need a metal drill bit.

 
After you have a hole, sand the rough edge from the drilled hole. 
(you don't want your penny biting you.)  I use an emery board

When you have a smooth edge on the hole, take a little baking soda and get it a little wet with water. You want a paste.  
Rub the penny to clean it. 

 Now, use your inner jewelry ninja and use jump rings to attach the penny's to a chain.  
I felt it was fashionable to use a copper bracelet.
  

I have been thinking of doing this for a long time.    
I am so glad I did.

If you try this, I would love to see your creations.
Have a fabulous day!  

- Tara