Monday, January 30, 2012

Historic Home Craft Fair.

On Saturday, I got to participate in a craft fair that was part of the Historic Homes Tour in Downtown Mesa.  This was fabulous.  A big thanks to Dorie who did so much work!  She has one of the Historic homes and has a wonderful blog!

Here are a few pictures from that day.

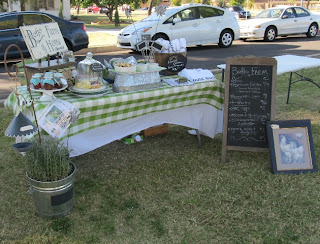
This is my little tent shop.  In the background you can see one of the beautiful Historic Home that was on tour.


 Cards, Cards, Cards and vintage sheet music!
 Rumba Pants!!!! (diaper covers) for boys and girls.


Here are my friends and neighbors at the fair:

FOUND-by-domestic-bliss   Love the vintage airstream!  And super great Neighbor.


Shabby Junker:
 Boho Farm and Home:  did you try the rose jelly?
 

  junkrestore:  the blue chair was a hit
 Possibility Decor:  the white and aqua zig zag chair was my favorite!

 Vintagebliss with Tricia :  Too die for finds and a fabulous pink vintage travel trailer!

Wish ya' all could have been there!  Come next time!

Sunday, January 15, 2012

My House of Love - Mini album

Just thought I would share a little album.  I was not able to show all of the pages on my online store, but I wanted to share the whole thing. It is ready for memories to be added.
It is the perfect little Pink and Black mini.  

This has been glitterfied!  The whole house is pink glitter.
The binding is book rings with lots of bits of lace and ribbon.

 The edge has tabs to make page flipping fun and easy.


The selection of the papers is quite whimsical and light hearted.  Hope you enjoy it as much as I did making it!

Update:  No longer available.

Friday, January 13, 2012

Eggs!!! Finally....

We have some chickens that we got last spring. 
We got four.

Three of the hens have been laying for 4 months. They started producing eggs at about 5 months.

But we have one that seems to be a little slow.  She is a big Americana.
Beautiful and fluffy.  She has ginger colored speckled feathers. 
Her name is Pocahontas (but I keep trying to call her Ginger or Big Bertha)
She has been the underdog.  She gets picked on by the other hens--the whole pecking order thing.
 
 Instead of a full fledged balk that chickens usually make, Pocahontas kind of chirps.  She seems to be a little delayed in her progression.  I was beginning to lose hope that she would start laying.  I would know when her eggs started to come because this breed has light blue or green eggs.  All we had been getting were brown.


But today was the Prize day!  Nine months old and A BIG  BLUE egg.
 
I was so excited.  As I picked it up, I noticed it was cracked.  DRAT!
 
I am hoping that the crack is because it fell out of the egg box, not because one of the hens decided to peck it.  We will see about that one. 
 But as you can see, the blue egg is larger than the other eggs. 
 I am so glad that Pocahontas is not a dud.  Thank you for your egg, Big girl. 

 (If you want to read more about the other chickens we had, go to the link on the side that is my "Other-older Blog"  It has lots more post about chickens.  Please note, those chickens were given a new home when we moved and are not the same ones you see here. It has been over two years, and we still miss them!)

Oh... and please like me on Facebook.https://www.facebook.com/pages/WhimsyFunk/245949558766231
Until next time!

Tuesday, January 10, 2012

Chocolate Love Blocks- (Wooden actually)

Who ever said that Love had to be pink!

A while back I made these little love blocks out of wood.   2X4's acutally.


A little sanding
A little painting
A little gluing

And you have a lotta love, worthy of a show and tell!


You can do this too.
Cut the 2X4 into 4 inch sections.  But make one 6 inches.
Sand the edges a little (no splinters in your fingers Please!)
Paint it a lovely shade of chocolate
When it is dry, sand the edges again for a weathered look.
Glue the die cut letters to the front
Embelish with a few ribbons and some little flowers
I also added some staples for a more rugged feel - but not too ruffed up.

Try this and send me a picture.  I'd love to see what you did!

Wednesday, January 4, 2012

Altered Dominos- tutorial


I learned a technique of making cool little dominoes.


Here is a step by step.

1.  ink the backs of the domino with alcohol ink
(let it dry, which takes almost no time at all)

2.  stamp images on the top of the alcohol inks
(use a solvant based ink like stayz on)

3.  Add glitter and shimmer with stickles

4. let it dry!

5.  lightly seal with a spray acrylic sealer.

These are a lot of fun to make.  They do take a little bit of time, because of drying time in between each step.  But worth the wait!

These are great as additions to scrapbooks, jewelry making, or anything else you could imagine.